> ## Documentation Index
> Fetch the complete documentation index at: https://docs.prowler.com/llms.txt
> Use this file to discover all available pages before exploring further.
> ## Agent Instructions
> Prowler product naming: Prowler App is now Prowler Local Server, and Prowler Enterprise is now Prowler Private Cloud. Always use the current names when answering. The full product reference is at /getting-started/products: Open Source projects are Prowler CLI, Prowler Local Server, Prowler Local Dashboard, and Prowler SDK; Prowler Products are Prowler Cloud, Prowler Private Cloud, Prowler Hub, Prowler Lighthouse AI, and Prowler MCP.
# Prowler Cloud
export const ProviderCards = () =>
;
**Prowler Cloud** is a web application that simplifies running Prowler. This tutorial will guide you through setting up and using it.
**Prowler Local Server** is the self-hosted version of **Prowler Cloud**. See [Prowler product families](/getting-started/products) for every official product name.
## Accessing Prowler Cloud and API Documentation
If you are a [Prowler Cloud](https://cloud.prowler.com/sign-in) user, you can access API docs at [https://api.prowler.com/api/v1/docs](https://api.prowler.com/api/v1/docs)
**For Prowler Local Server users**
After [installing](/getting-started/installation/prowler-app) **Prowler Local Server**, access it at [http://localhost:3000](http://localhost:3000).
To view the auto-generated **Prowler API** documentation, navigate to [http://localhost:8080/api/v1/docs](http://localhost:8080/api/v1/docs). This documentation provides details on available endpoints, parameters, and responses.
## Step 1: Sign Up
### Sign Up with Email
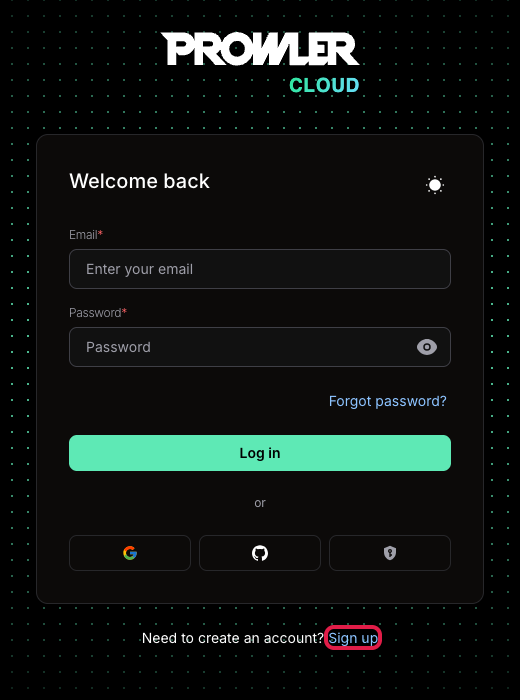
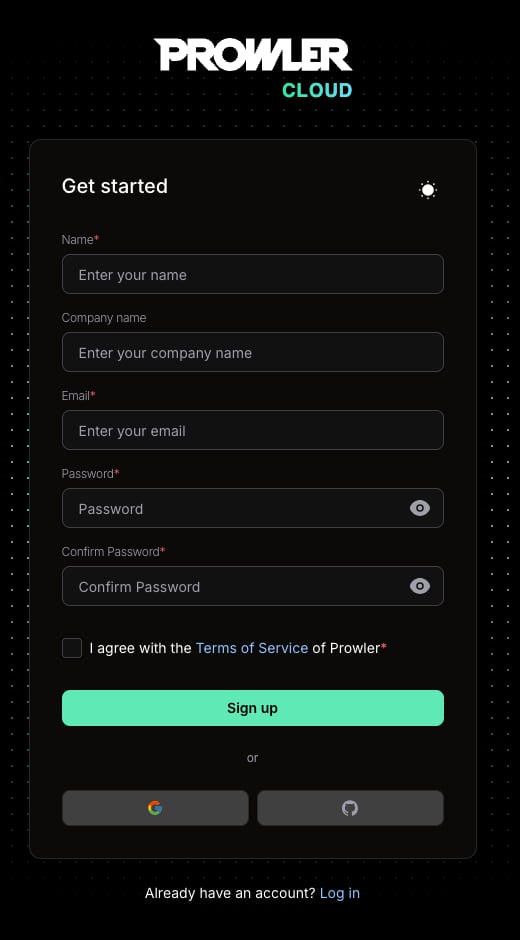
To get started, sign up using your email and password:
 ### Sign Up with Social Login
If Social Login is enabled, you can sign up using your preferred provider (e.g., Google, GitHub).
**How Social Login Works**
If your email is already registered, you will be logged in, and your social account will be linked.
If your email is not registered, a new account will be created using your social account email.
**Enable Social Login**
See [how to configure Social Login for Prowler](/user-guide/tutorials/prowler-app-social-login) to enable this feature in your own deployments.
## Step 2: Log In
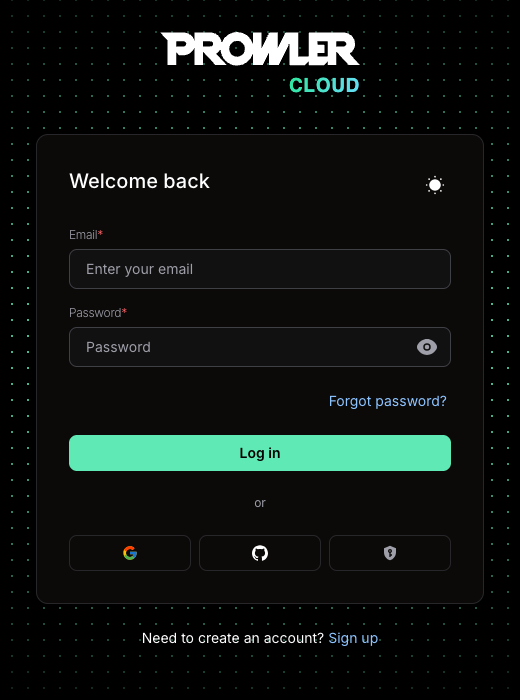
Once registered, log in with your email and password to access Prowler Cloud.
### Sign Up with Social Login
If Social Login is enabled, you can sign up using your preferred provider (e.g., Google, GitHub).
**How Social Login Works**
If your email is already registered, you will be logged in, and your social account will be linked.
If your email is not registered, a new account will be created using your social account email.
**Enable Social Login**
See [how to configure Social Login for Prowler](/user-guide/tutorials/prowler-app-social-login) to enable this feature in your own deployments.
## Step 2: Log In
Once registered, log in with your email and password to access Prowler Cloud.
 Upon logging in, the Overview page will display. At this stage, no data is present: add a provider to begin scanning your cloud environment.
## Step 3: Add a Provider
To perform security scans, link a cloud provider account. Prowler supports the following providers and more:
* **AWS**
* **Azure**
* **Google Cloud Platform (GCP)**
* **Kubernetes**
* **M365**
* **GitHub**
* **Oracle Cloud Infrastructure (OCI)**
Steps to add a provider:
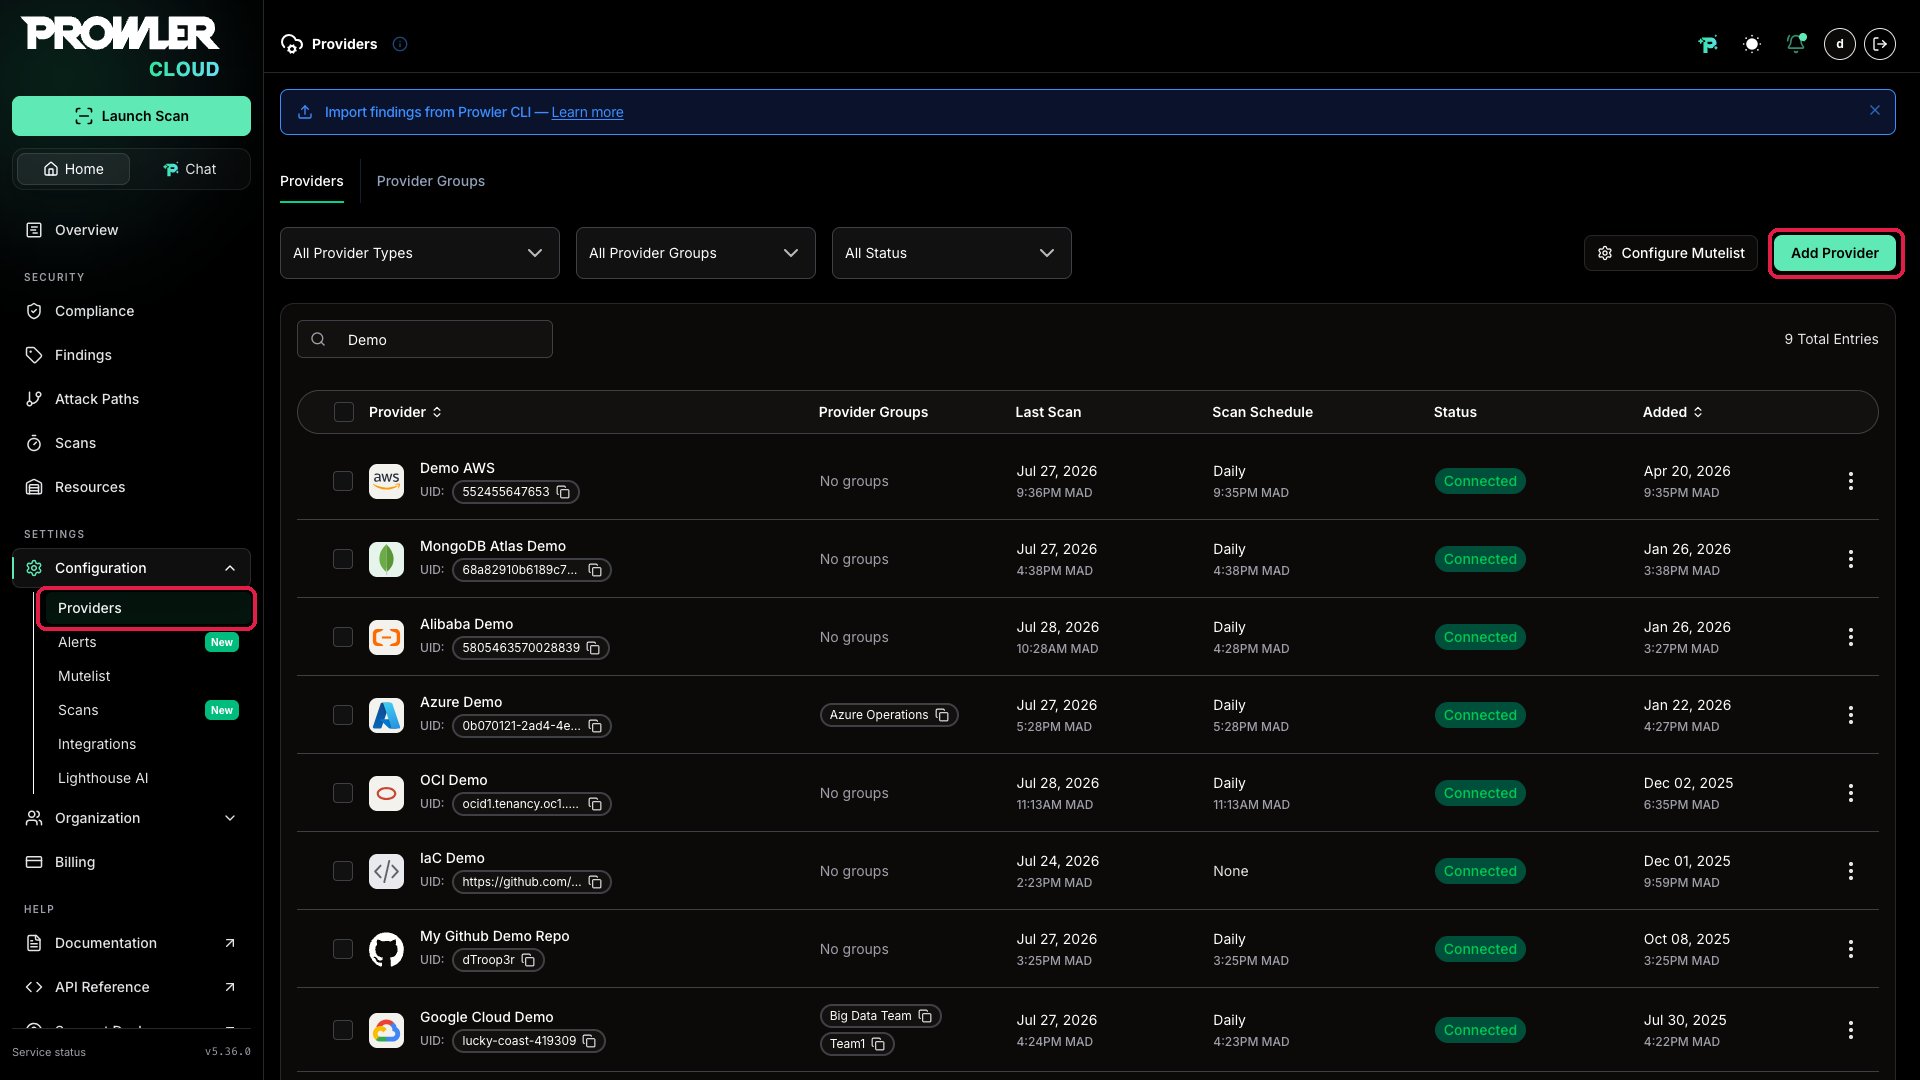
1. Navigate to `Settings > Providers`.
2. Click `Add Provider` to set up a new provider and provide your credentials.
Upon logging in, the Overview page will display. At this stage, no data is present: add a provider to begin scanning your cloud environment.
## Step 3: Add a Provider
To perform security scans, link a cloud provider account. Prowler supports the following providers and more:
* **AWS**
* **Azure**
* **Google Cloud Platform (GCP)**
* **Kubernetes**
* **M365**
* **GitHub**
* **Oracle Cloud Infrastructure (OCI)**
Steps to add a provider:
1. Navigate to `Settings > Providers`.
2. Click `Add Provider` to set up a new provider and provide your credentials.
 ## Step 4: Configure the Provider
Select the cloud provider to scan and configure authentication credentials. Each provider has specific requirements and authentication methods.
## Step 4: Configure the Provider
Select the cloud provider to scan and configure authentication credentials. Each provider has specific requirements and authentication methods.
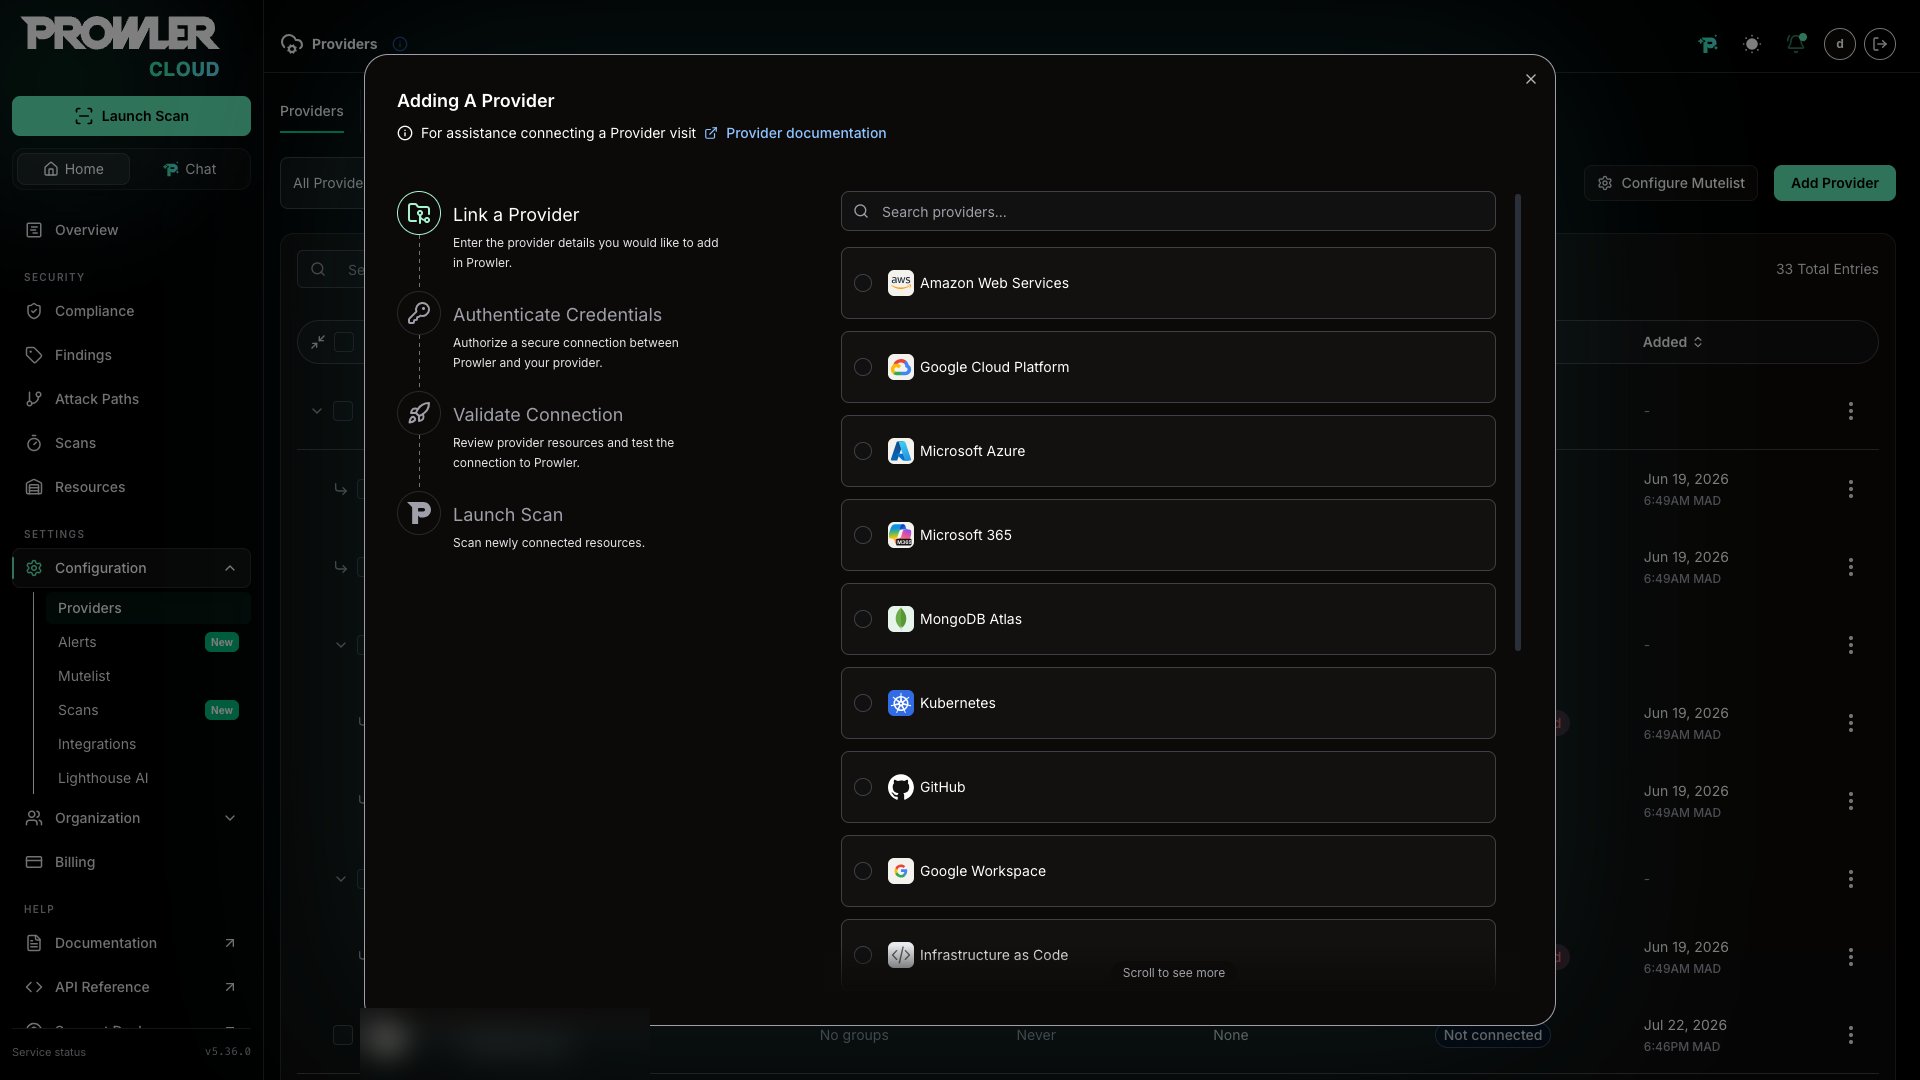 For detailed instructions on configuring credentials for each provider, refer to the provider-specific getting started guides:
## Step 5: Test Connection
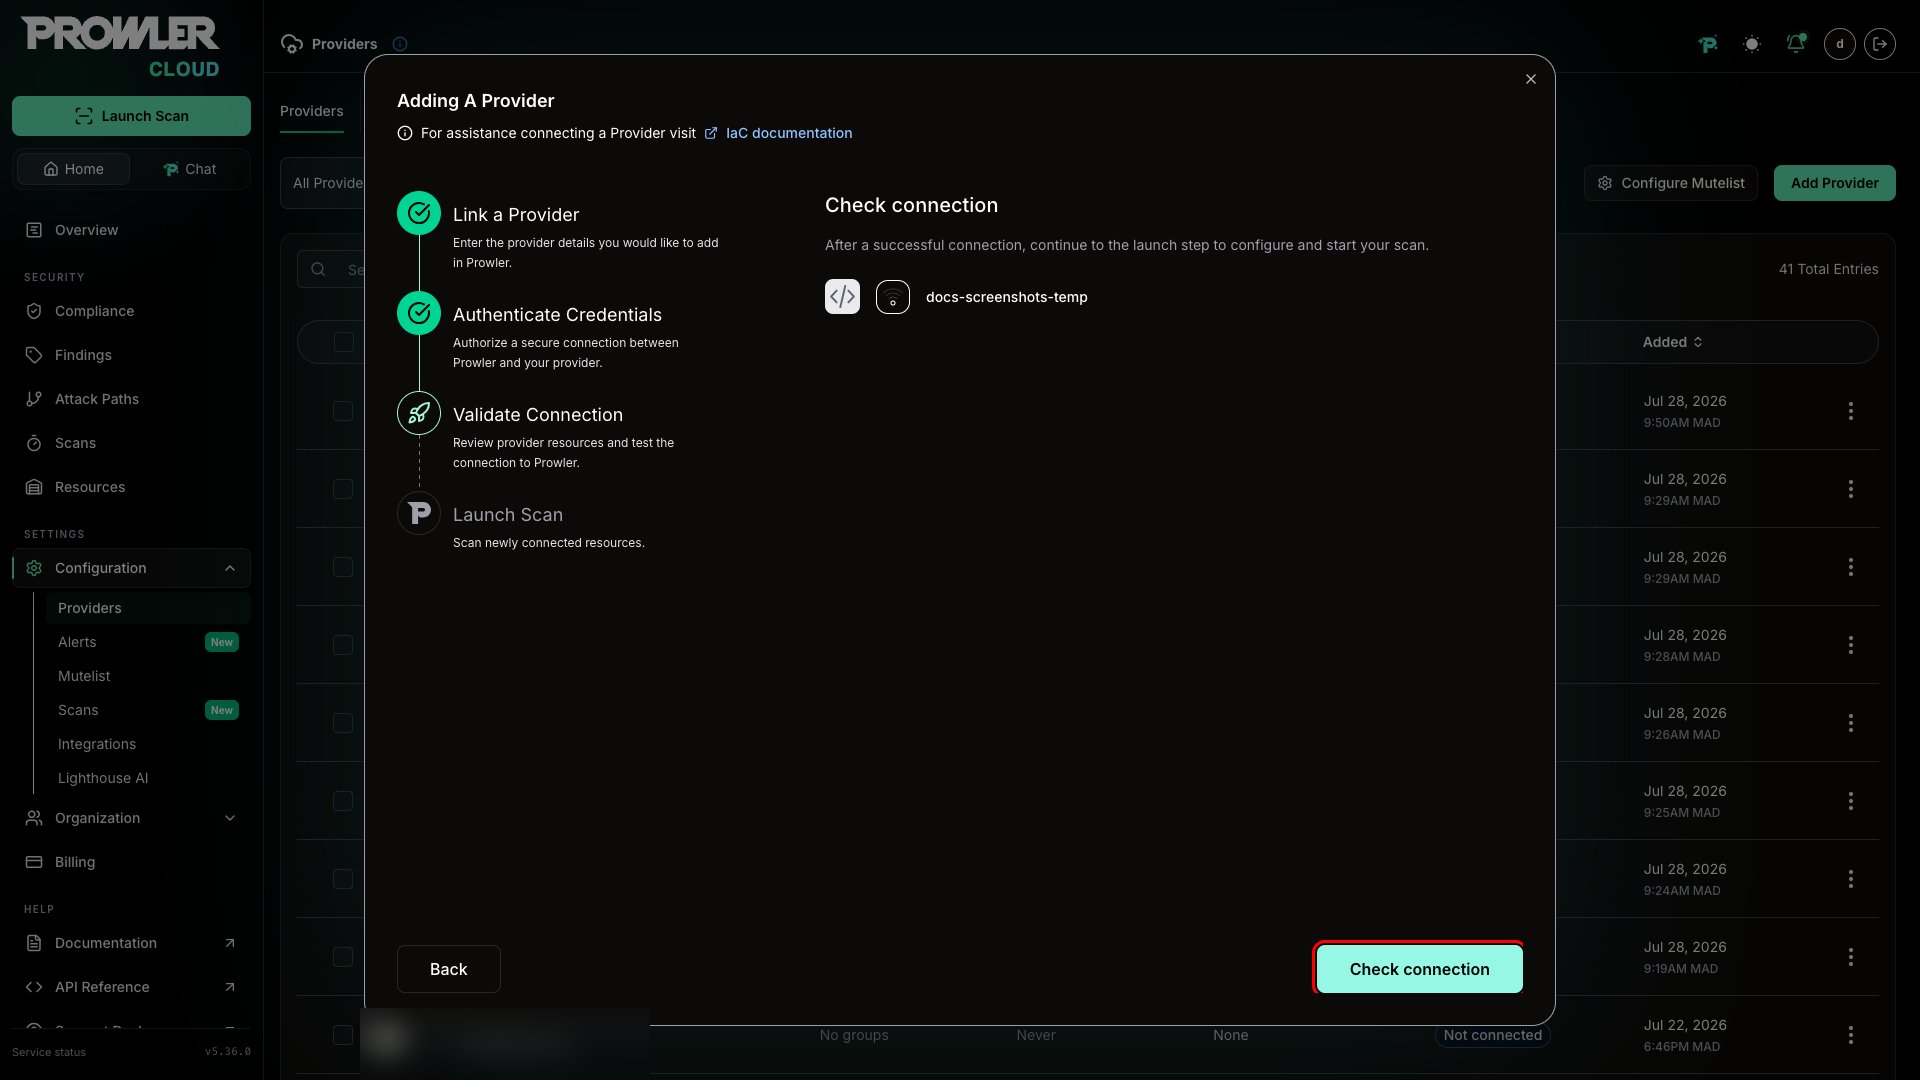
After adding your cloud account credentials, click the `Check connection` button to verify that Prowler can successfully connect to your provider:
For detailed instructions on configuring credentials for each provider, refer to the provider-specific getting started guides:
## Step 5: Test Connection
After adding your cloud account credentials, click the `Check connection` button to verify that Prowler can successfully connect to your provider:
 ## Step 6: Scan Started
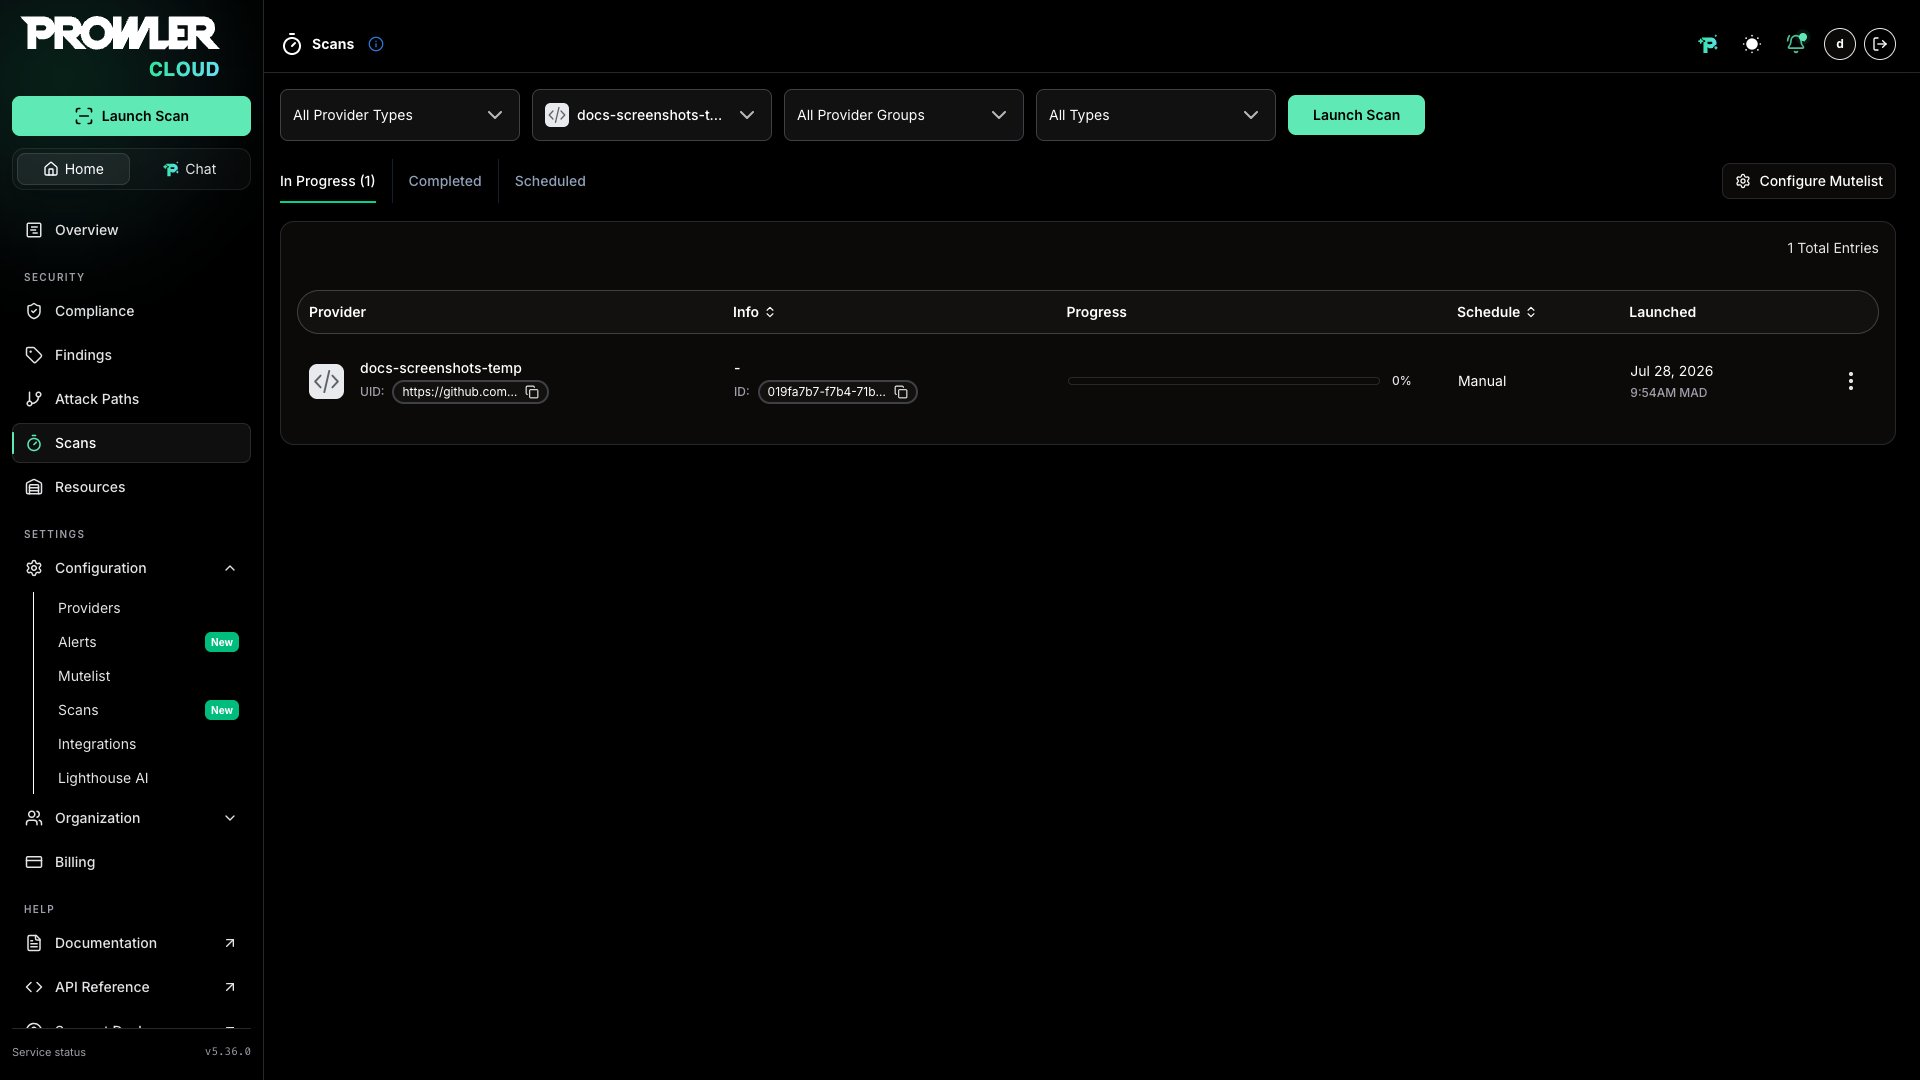
After the connection check succeeds, save the provider and start your first scan with the `Launch Scan` button. The `Scans` section shows the scan in progress:
## Step 6: Scan Started
After the connection check succeeds, save the provider and start your first scan with the `Launch Scan` button. The `Scans` section shows the scan in progress:
 Prowler will automatically scan all configured providers every **24 hours**, ensuring your cloud environment stays continuously monitored.
## Step 7: Monitor Scan Progress
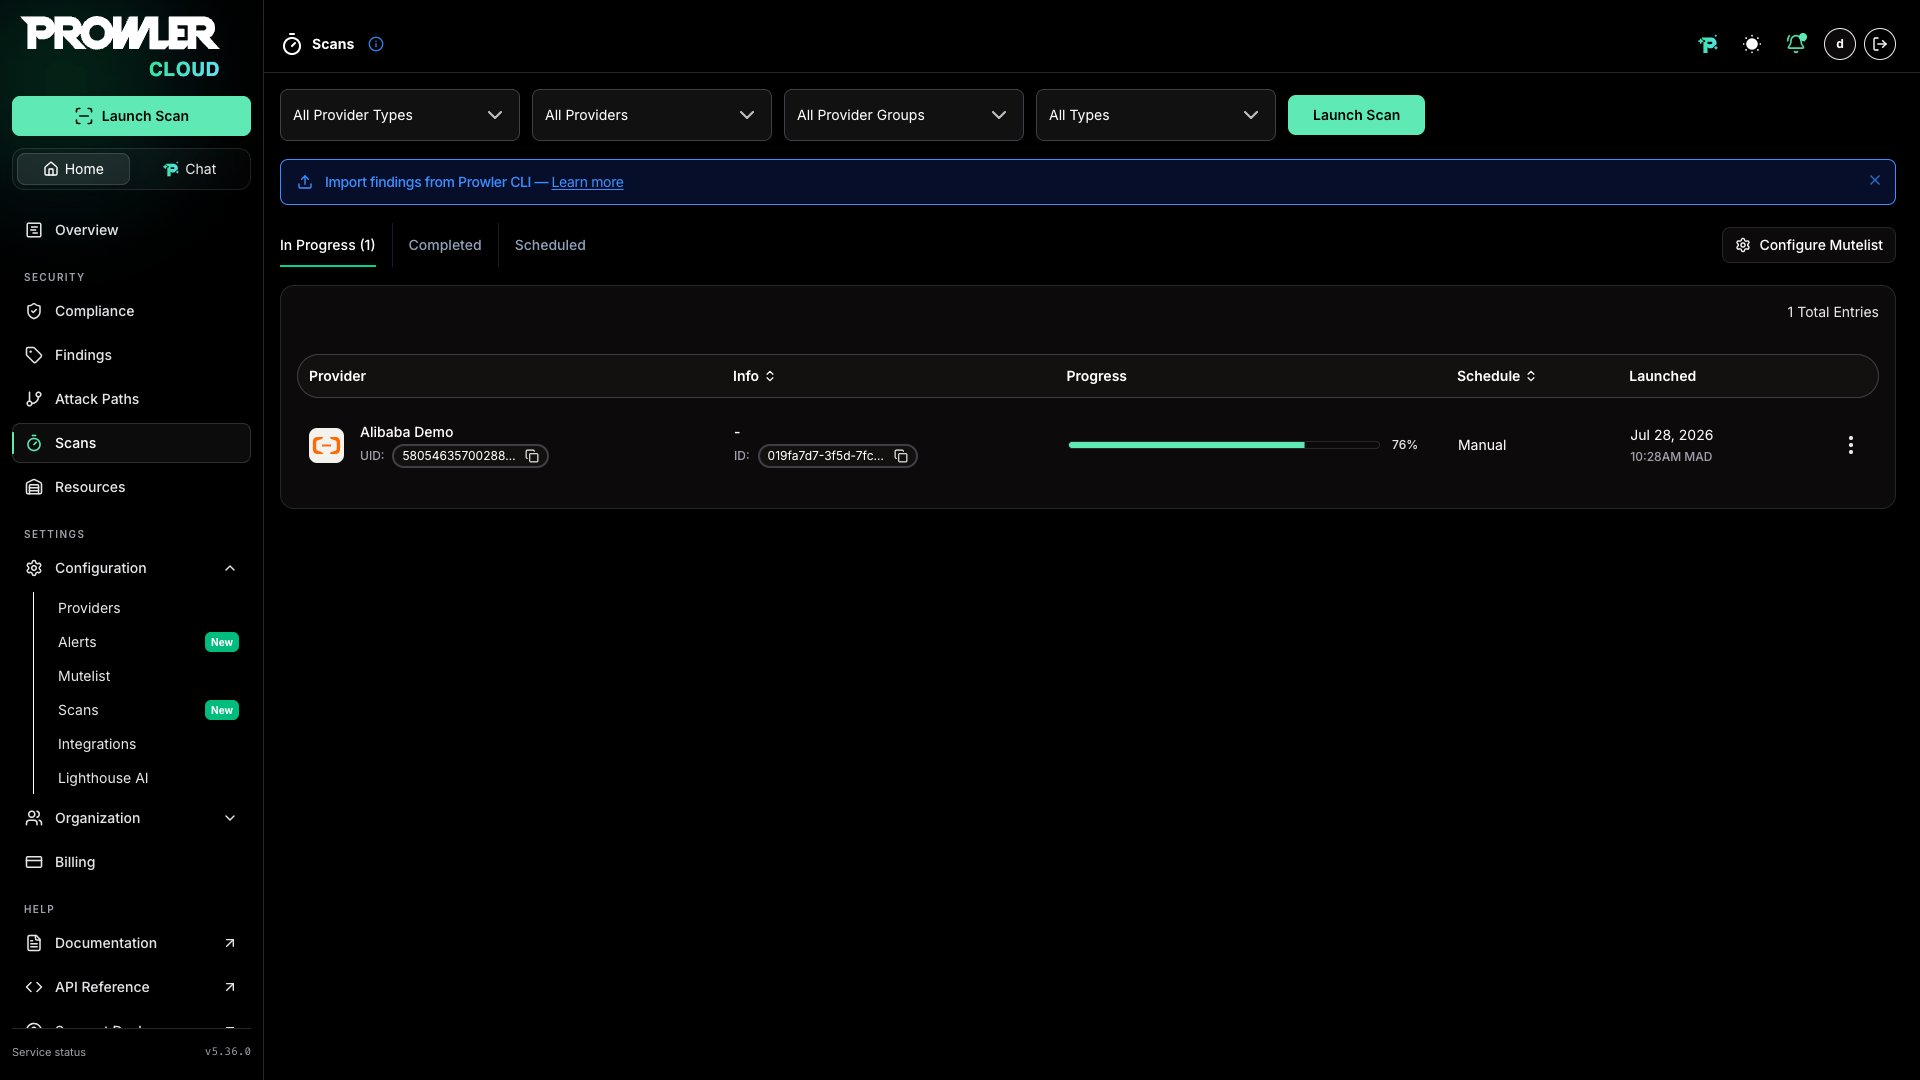
Track the progress of your scan in the `Scans` section:
Prowler will automatically scan all configured providers every **24 hours**, ensuring your cloud environment stays continuously monitored.
## Step 7: Monitor Scan Progress
Track the progress of your scan in the `Scans` section:
 **How Dashboards Display Scan Data**
Each dashboard handles scan data differently:
* **Overview** displays aggregated metrics from the **latest completed scan per provider** only.
* **Findings** displays results from the **latest completed scan per provider** by default. To access historical findings, apply a date or scan filter.
* **Resources** lists **all discovered resources across all scans**. However, when selecting a resource, the Findings tab within the resource detail shows only findings from the **latest completed scan**. If the latest scan did not evaluate a particular resource, its Findings tab may appear empty.
When a new scan completes or a new data ingestion is processed, the dashboards automatically reflect the updated results.
## Step 8: Analyze the Findings
While the scan is running, start exploring the findings in these sections:
* **Overview**: High-level summary of the scans.
**How Dashboards Display Scan Data**
Each dashboard handles scan data differently:
* **Overview** displays aggregated metrics from the **latest completed scan per provider** only.
* **Findings** displays results from the **latest completed scan per provider** by default. To access historical findings, apply a date or scan filter.
* **Resources** lists **all discovered resources across all scans**. However, when selecting a resource, the Findings tab within the resource detail shows only findings from the **latest completed scan**. If the latest scan did not evaluate a particular resource, its Findings tab may appear empty.
When a new scan completes or a new data ingestion is processed, the dashboards automatically reflect the updated results.
## Step 8: Analyze the Findings
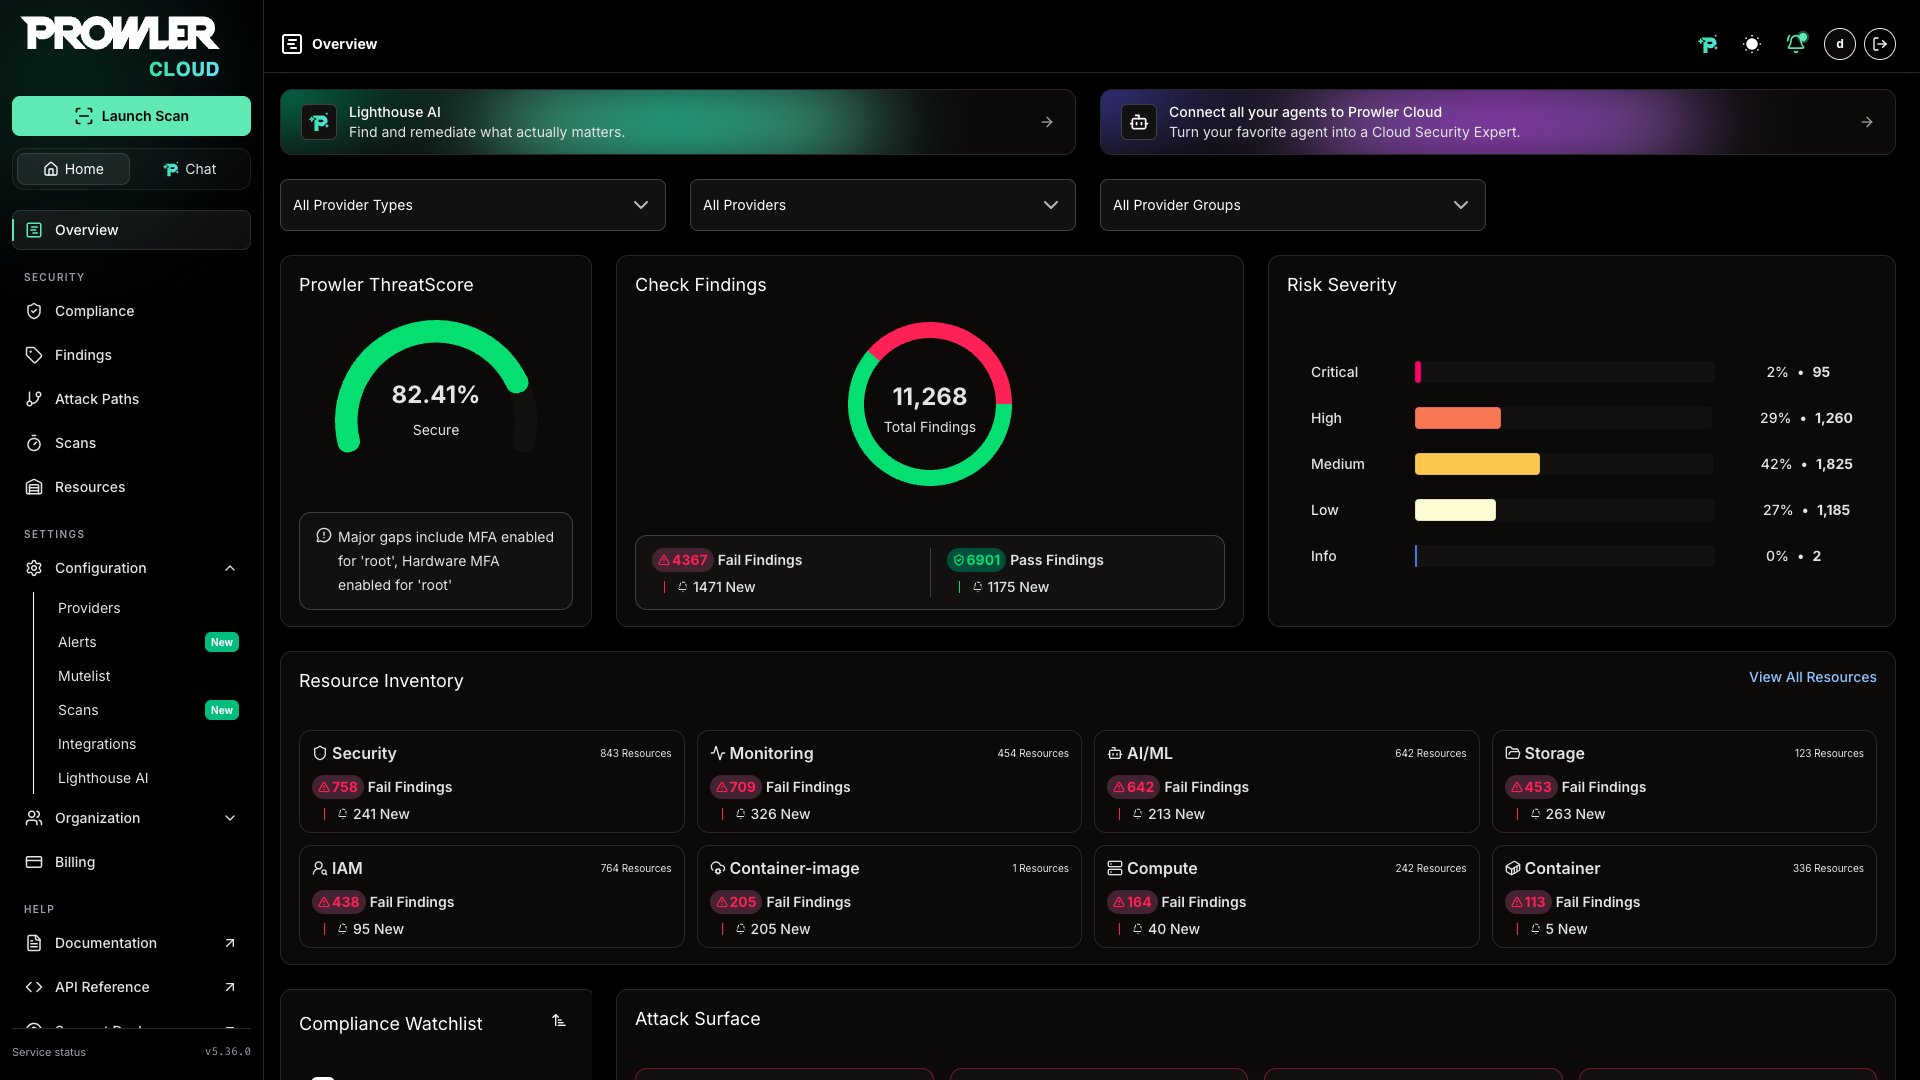
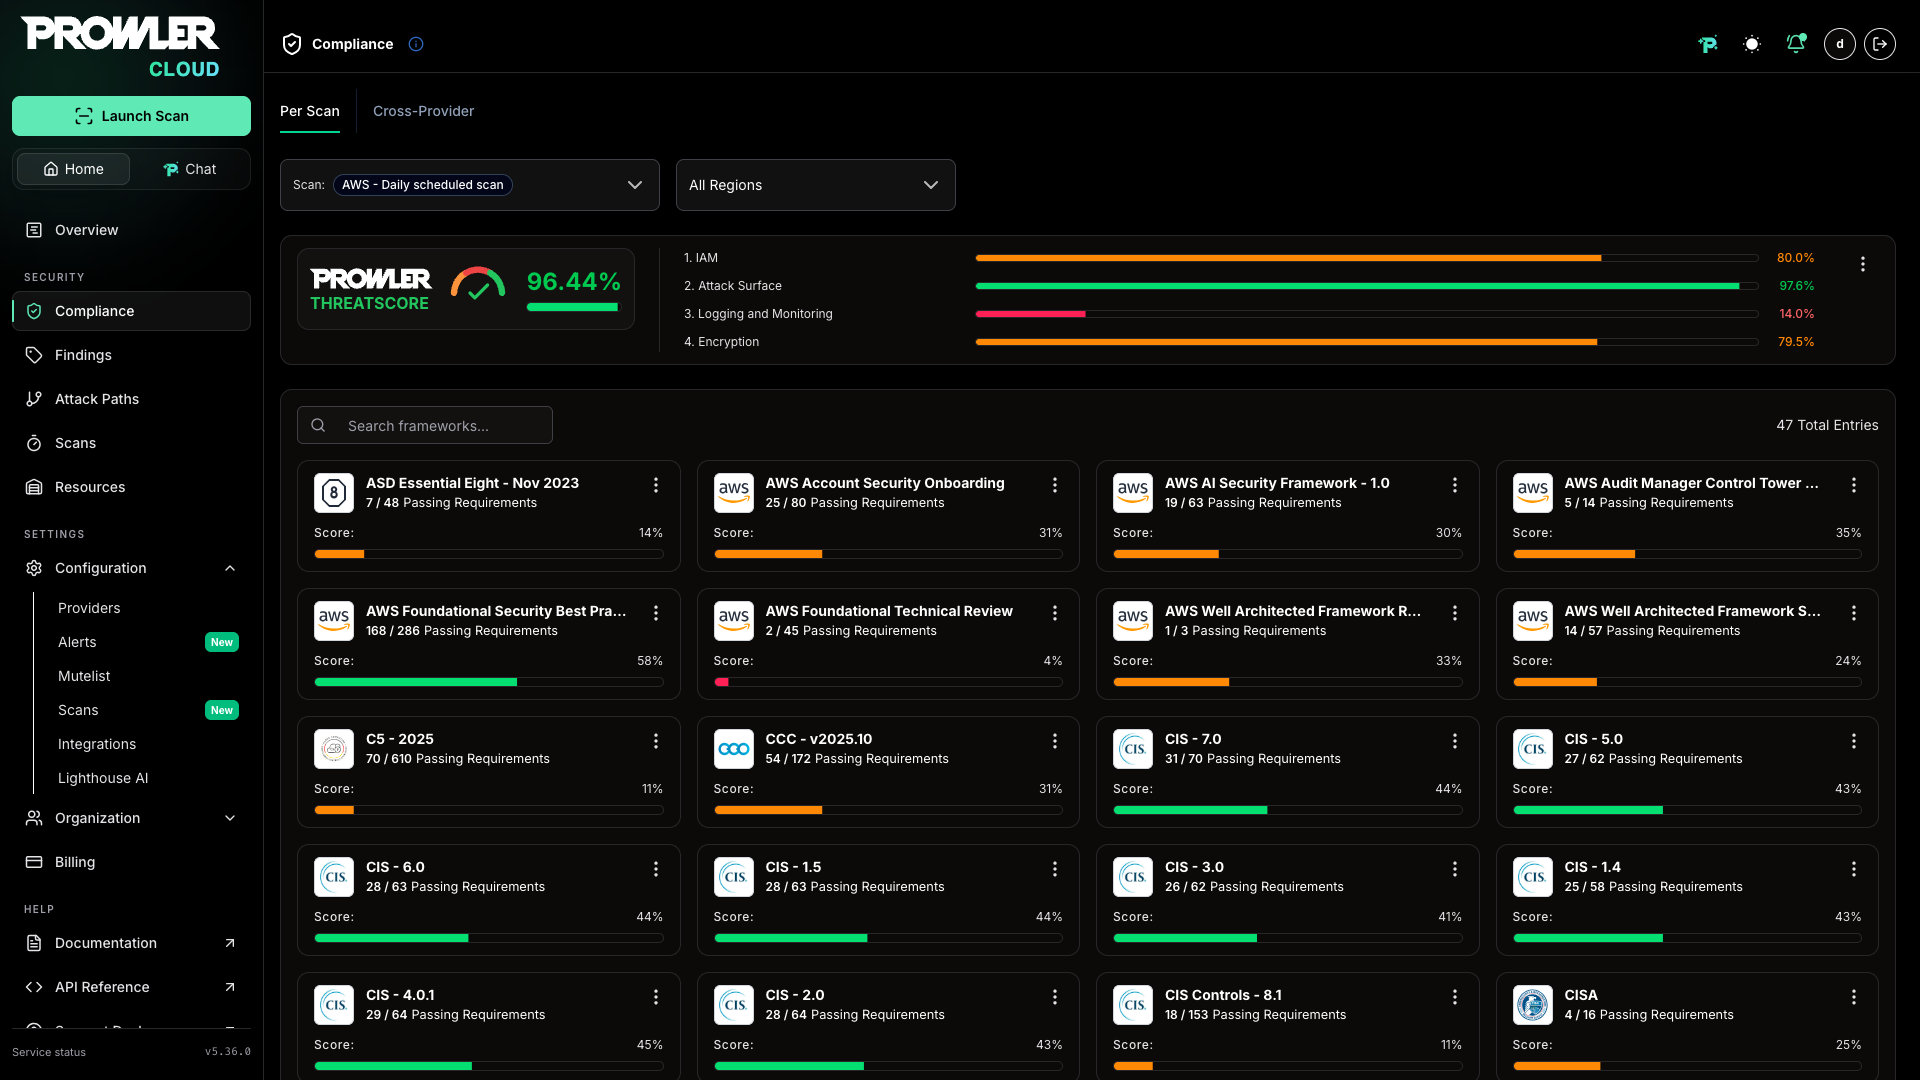
While the scan is running, start exploring the findings in these sections:
* **Overview**: High-level summary of the scans.
 * **Compliance**: Insights into compliance status.
 * **Findings**: Detailed list of findings detected, where you can filter by severity, service, and more.
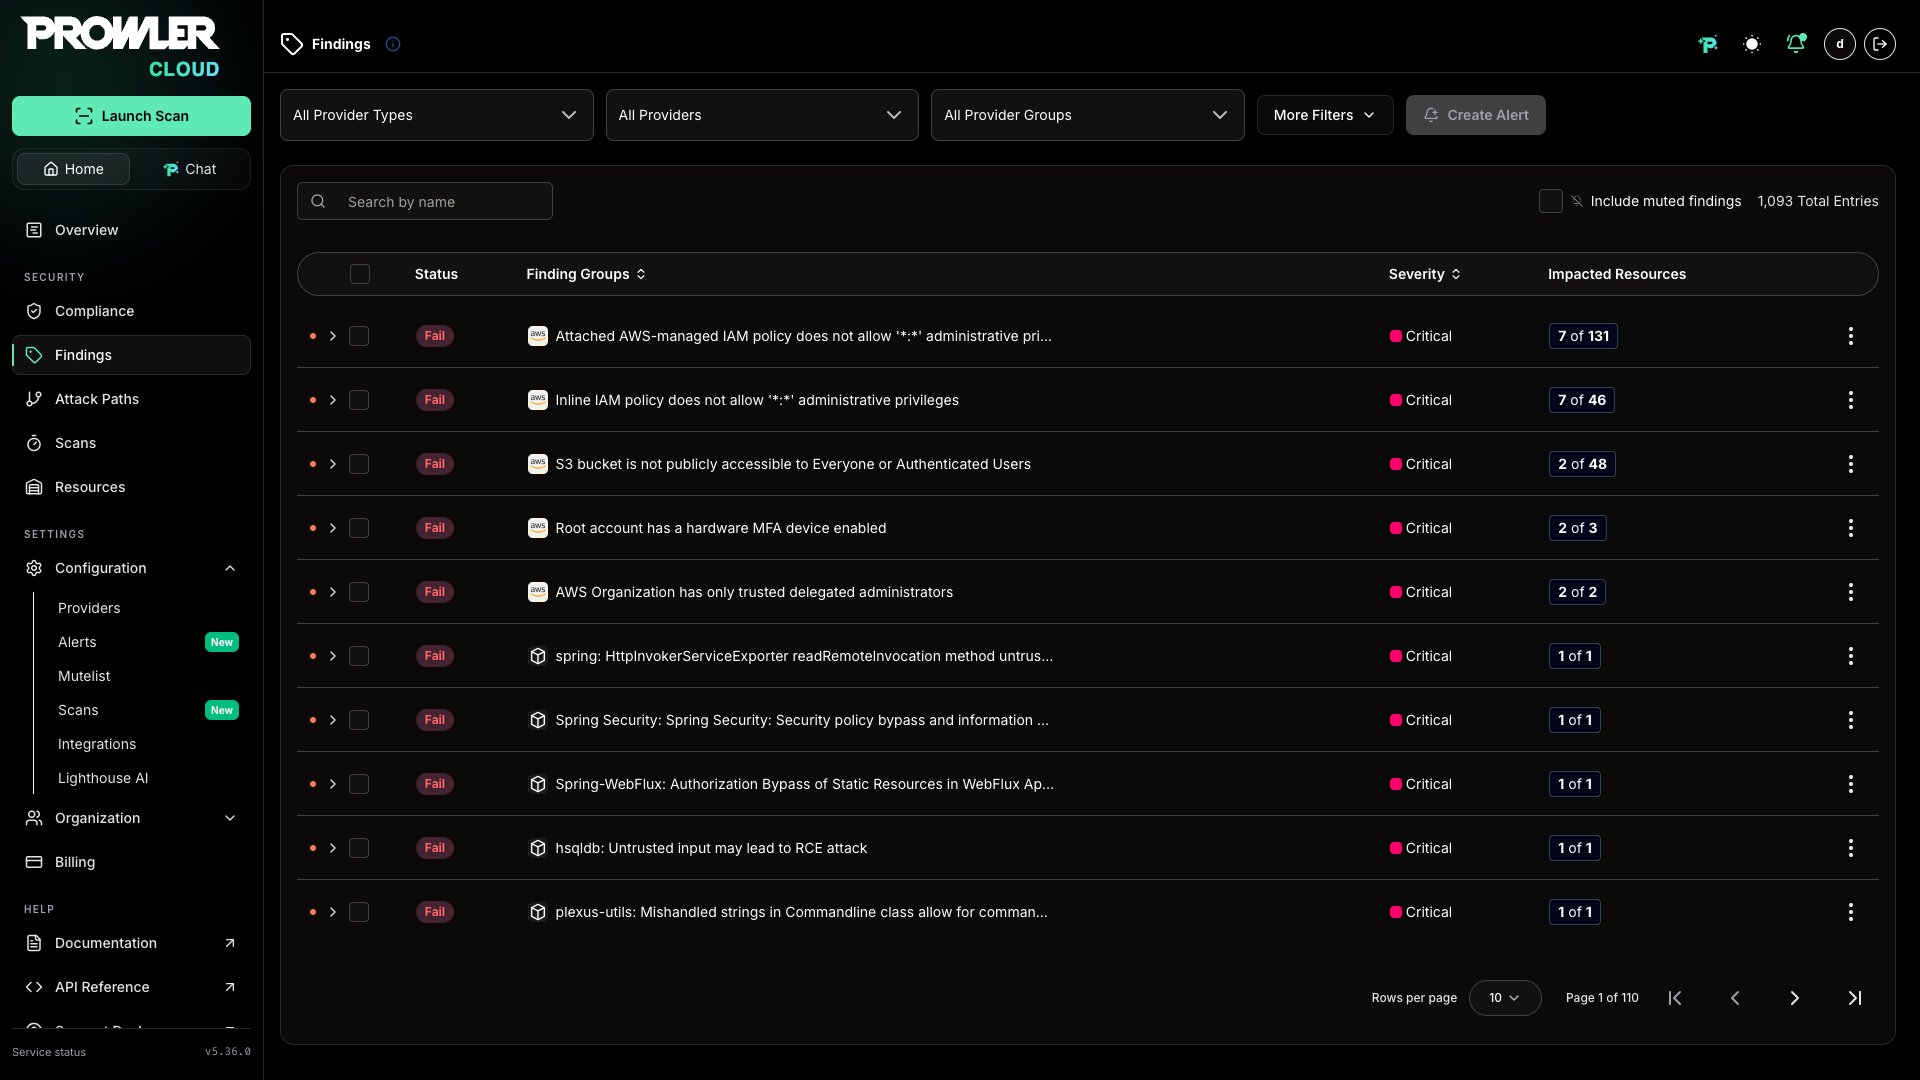 To view all `new` findings that have not been seen prior to this scan, click the `Delta` filter and select `new`. To view all `changed` findings that have had a status change (from `PASS` to `FAIL` for example), click the `Delta` filter and select `changed`.
## Step 9: Download the Outputs
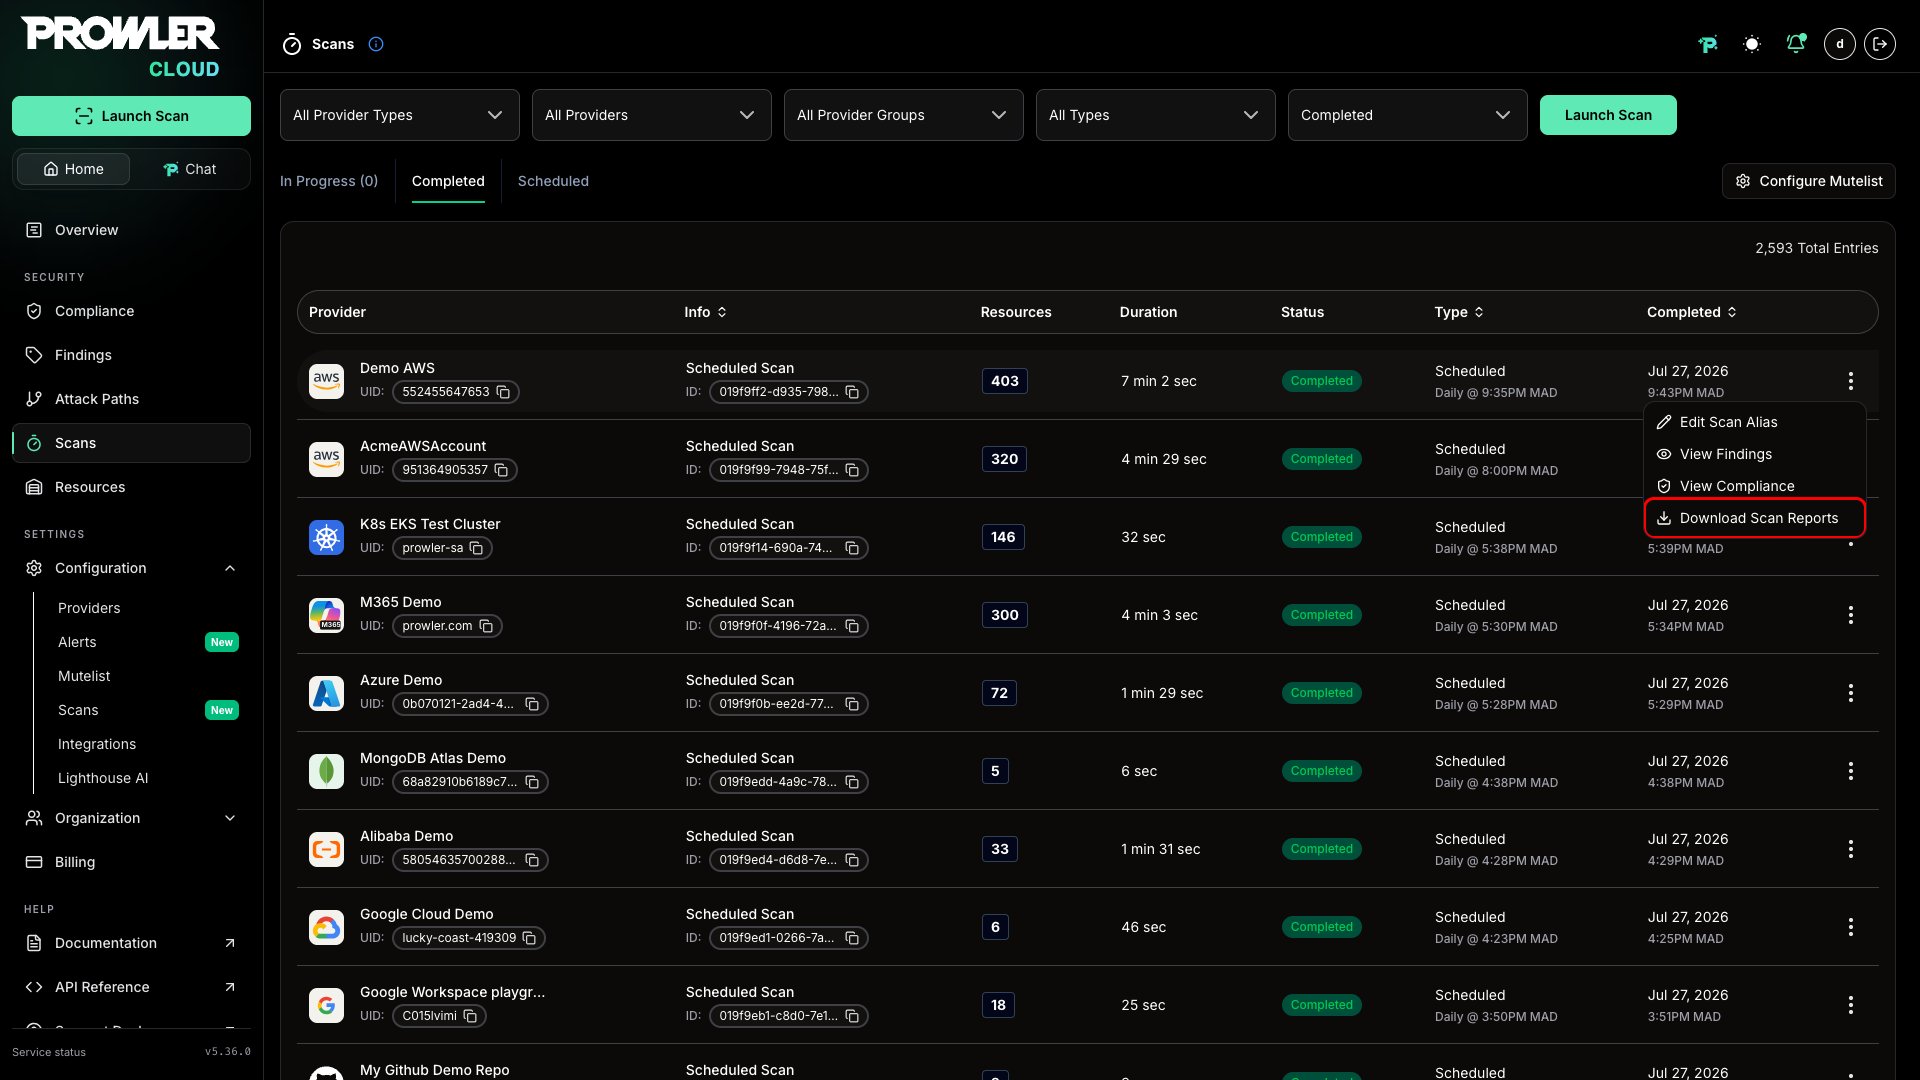
Once a scan is complete, navigate to the `Scans` section to download the output files generated by Prowler:
You can download the output files generated by Prowler as a single `zip` file. This archive contains the CSV, JSON-OCSF, and HTML reports detailing the findings.
To download these files, click the **Download** button. This button becomes available only after the scan has finished.
To view all `new` findings that have not been seen prior to this scan, click the `Delta` filter and select `new`. To view all `changed` findings that have had a status change (from `PASS` to `FAIL` for example), click the `Delta` filter and select `changed`.
## Step 9: Download the Outputs
Once a scan is complete, navigate to the `Scans` section to download the output files generated by Prowler:
You can download the output files generated by Prowler as a single `zip` file. This archive contains the CSV, JSON-OCSF, and HTML reports detailing the findings.
To download these files, click the **Download** button. This button becomes available only after the scan has finished.
 The `zip` file unpacks into a folder named like `prowler-output--`, which includes all of the above outputs. In the example below, you can see the `.csv`, `.json`, and `.html` reports alongside a subfolder for detailed compliance checks.
 **API Note**
For more information about the API endpoint used by the UI to download the ZIP archive, refer to: [Prowler API Reference - Download Scan Output](https://api.prowler.com/api/v1/docs#tag/Scan/operation/scans_report_retrieve)
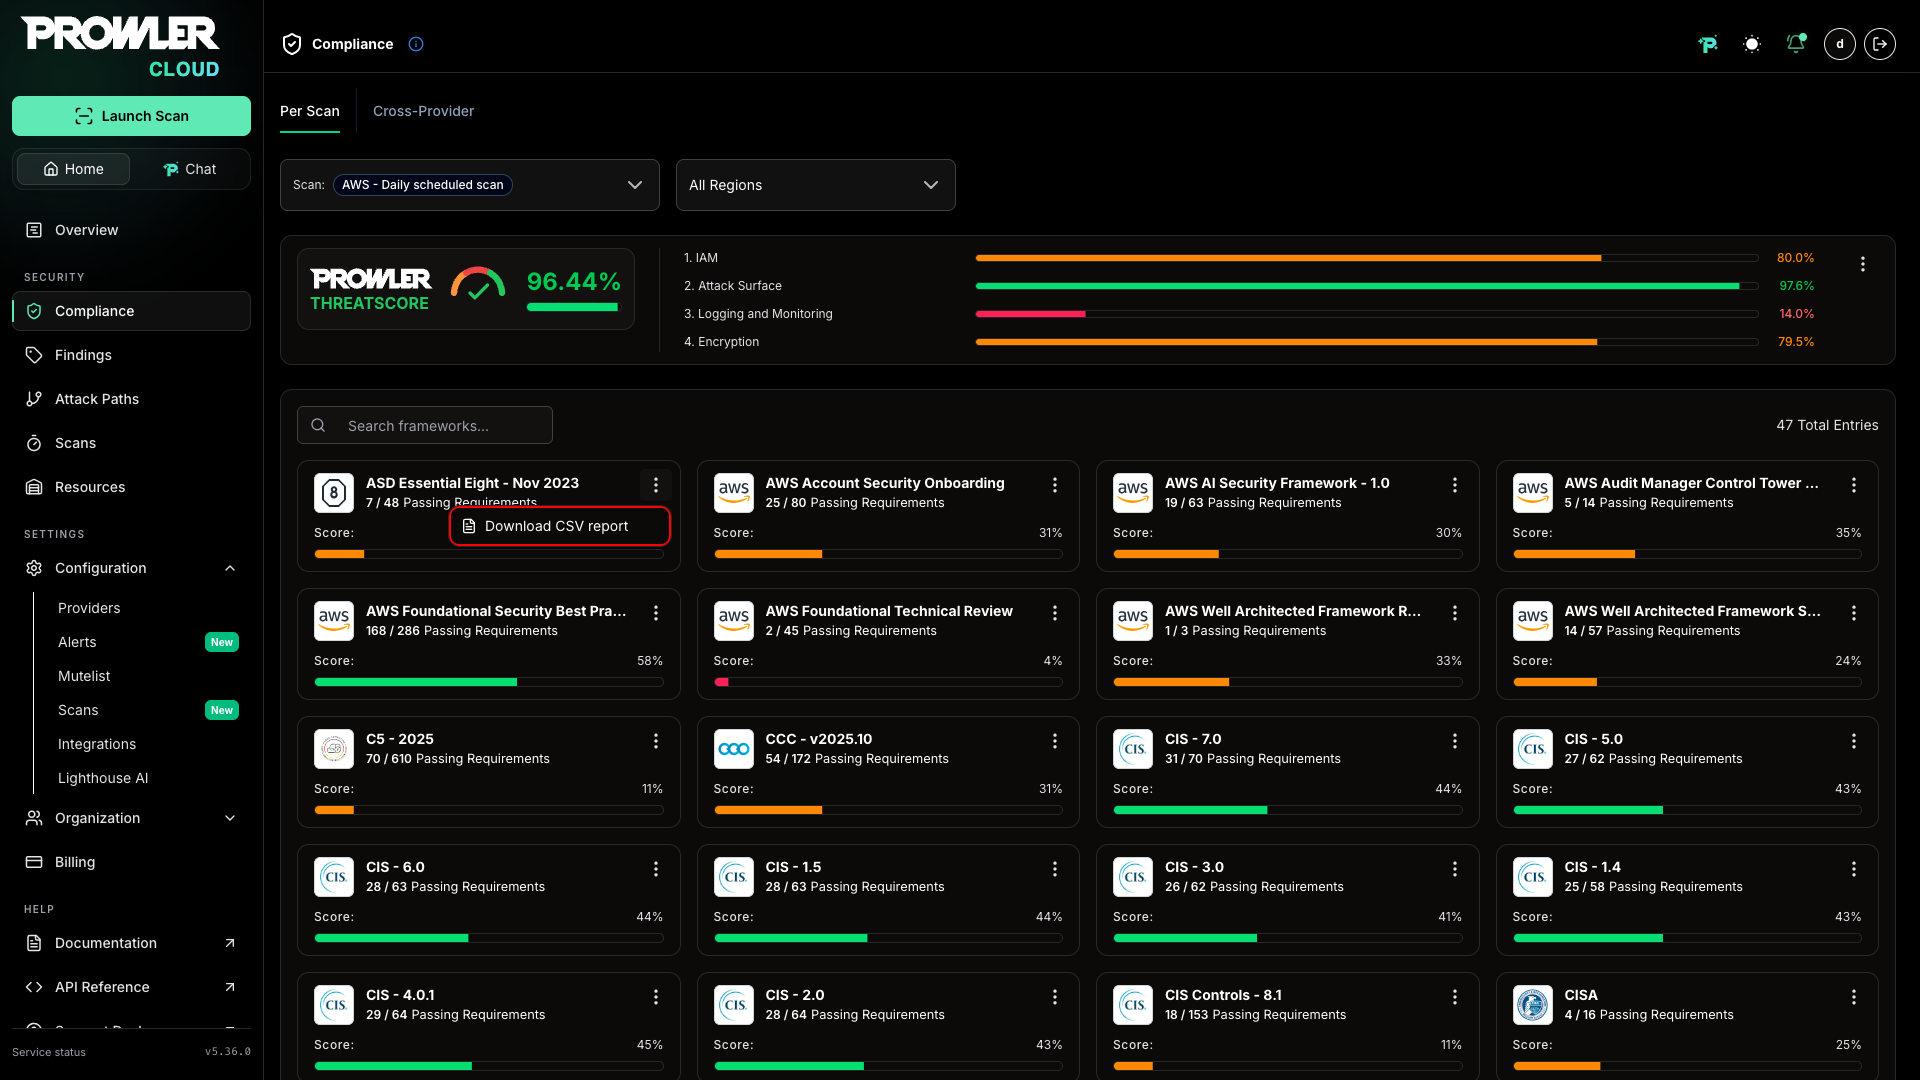
## Step 10: Download Specified Compliance Report
Once your scan has finished, you don’t need to grab the entire ZIP—just pull down the specific compliance report you want:
* Navigate to the **Compliance** section of the UI.
* Find the Framework report you need.
* Click its **Download** icon to retrieve that report’s CSV file with all the detailed findings.
**API Note**
For more information about the API endpoint used by the UI to download the ZIP archive, refer to: [Prowler API Reference - Download Scan Output](https://api.prowler.com/api/v1/docs#tag/Scan/operation/scans_report_retrieve)
## Step 10: Download Specified Compliance Report
Once your scan has finished, you don’t need to grab the entire ZIP—just pull down the specific compliance report you want:
* Navigate to the **Compliance** section of the UI.
* Find the Framework report you need.
* Click its **Download** icon to retrieve that report’s CSV file with all the detailed findings.
 **API Note**
To fetch a single compliance report via API, see the Retrieve compliance report as CSV endpoint in the Prowler API Reference.[Prowler API Reference - Retrieve compliance report as CSV](https://api.prowler.com/api/v1/docs#tag/Scan/operation/scans_compliance_retrieve)
## Related topics
- [Alibaba Cloud Authentication in Prowler](/user-guide/providers/alibabacloud/authentication.md)
- [Organizations Across Cloud Providers](/user-guide/organizations.md)
- [Getting Started With Alibaba Cloud on Prowler](/user-guide/providers/alibabacloud/getting-started-alibabacloud.md)
- [Microsoft Defender for Cloud](/getting-started/comparison/microsoftdefender.md)
- [Huawei Cloud Authentication in Prowler](/user-guide/providers/huaweicloud/authentication.md)
**API Note**
To fetch a single compliance report via API, see the Retrieve compliance report as CSV endpoint in the Prowler API Reference.[Prowler API Reference - Retrieve compliance report as CSV](https://api.prowler.com/api/v1/docs#tag/Scan/operation/scans_compliance_retrieve)
## Related topics
- [Alibaba Cloud Authentication in Prowler](/user-guide/providers/alibabacloud/authentication.md)
- [Organizations Across Cloud Providers](/user-guide/organizations.md)
- [Getting Started With Alibaba Cloud on Prowler](/user-guide/providers/alibabacloud/getting-started-alibabacloud.md)
- [Microsoft Defender for Cloud](/getting-started/comparison/microsoftdefender.md)
- [Huawei Cloud Authentication in Prowler](/user-guide/providers/huaweicloud/authentication.md)